
Showing posts with label women. Show all posts
Showing posts with label women. Show all posts
Tuesday, May 10, 2011
Make Me Beautiful
I was browsing my reader and saw this great article on Ucreate about doing makeup. I was reasonably good at painting, and found that doing makeup is not at all unlike painting a canvas. I developed some skills and learned a ton from the ladies at the MAC counter. I think I'll follow suit and post a few articles myself. Are you excited?
Tuesday, April 12, 2011
The Shoe Splurge

http://shop.nordstrom.com/s/enzo-angiolini-martini-pump/3150125?origin=wlSeeColorsNViews&tn=swatch_popup
I couldn't help myself. My mom sent me the link and it was a done deal even before I asked Jon if I could have them. It wasn't really a question. More like a statement. Can't wait to make the perfect dress to go with these babies!
Saturday, March 19, 2011
El Cheapo 6: Easy Box Pleat Tshirt
My apologies! I am so sorry that I wasn't on top of life and didn't get this posted in time. I wasn't actually going to post this one till next week, but I'm still working out kinks on the other project. At any rate, I love how quick and easy this shirt is. It took all of 5 minutes to hand sew, so it is easily done in a nap time.
Materials:
1-shirt ($5 from Down East Basics, on sale)
matching thread and needle
straight pins
1. Take your shirt and find the center, marking it with a straight pin. Then make a box pleat that is 1 1/4" wide. Pin it well.


2. Using your needle and thread, sew (a running stitch) right underneath the surged edge, making sure to catch all layers of fabric.

3. You're done!!!

Thursday, February 3, 2011
Pearlized T-Shirt

This is my little way of saying thanks for reading! I can't even begin to tell you how excited I am to share this with you FINALLY!!! I've had it mostly finished for some time, but life has been complicated and I haven't had the time to finish it until earlier this week. I've tried to be very clear in the directions, but if it is confusing, please let me know. :)
Materials:
1 t-shirt
1-2 pkg. Large glass pearls
1-2 pkg. small glass pearls
Interfacing
Thread

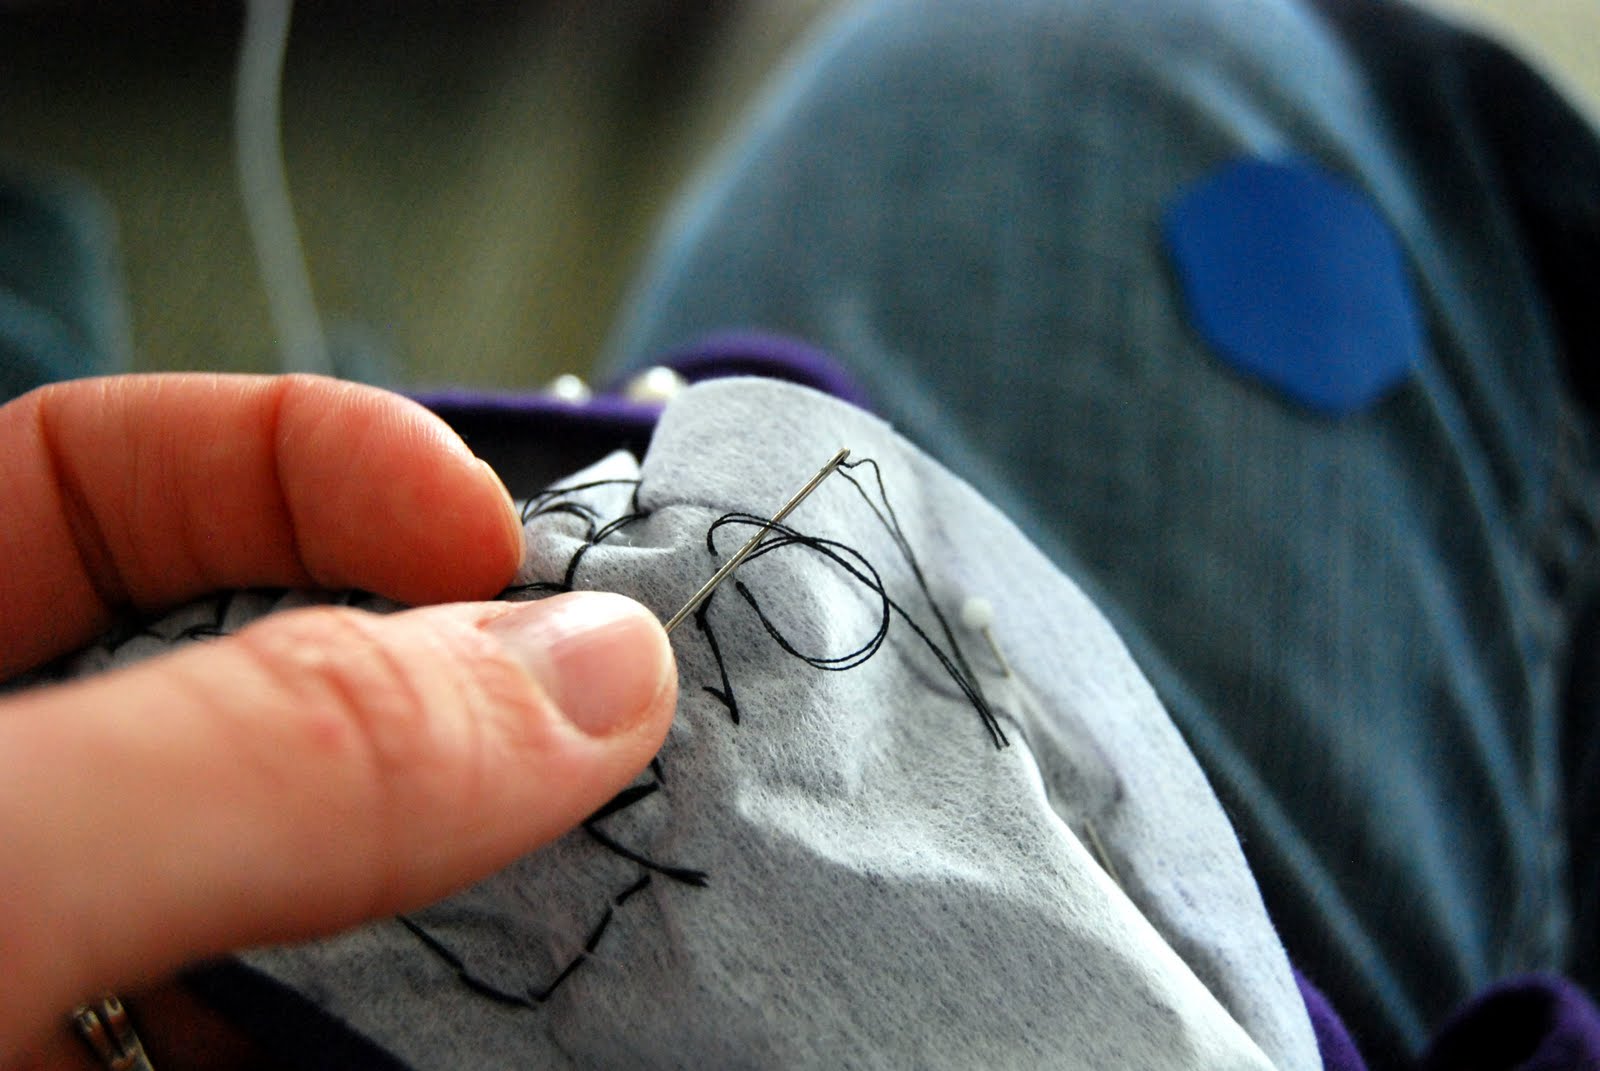
1. Using a bowl, create a half moon shape (doesn't have to fit very well-you can trim it if it peeks out the top) and pin it to the inside of your shirt.

2. Tie a double knot in your thread (2 strings thick) and sew your pearls randomly in a crescent shape. It should be thicker near the center and thinner near the shoulders.

3. When you run out of thread, you'll need to tie it off securely. On the inside of the shirt pick up a few threads of interface/fabric...

4. Before pulling tight, thread the needle through the loop you just created...

5. Thread the needle through the loop you just made (the 2nd loop) and pull tight.
6. You're done!

Tuesday, February 1, 2011
Wispy Earrings

These earrings were inspired by a pair my aunt has. I love them, but I have no idea where I could find them. :) They are sterling silver (as all of my pieces are), super simple, and WAY easy to make. If enough of you are interested, I'll make a tutorial so you can have some too!

*I'm sorry for the lame-ness of this post. I had fully intended on posting a really great shirt tutorial, but mother nature gave us a wonderful ice storm that prevented me from getting my projects done. This Thursday, get ready to be amazed (provided I still have power/internet)!
Thursday, January 27, 2011
Stringing Beads for the Beaded Flower Shirt
Sorry it has taken me so long to post this today. Between snotty noses, poopy diapers, speech therapy, and feeding the kiddos, it has been a busy day. :) This post is a mini tute that goes along with the Beaded Flower Shirt. Go check it out!
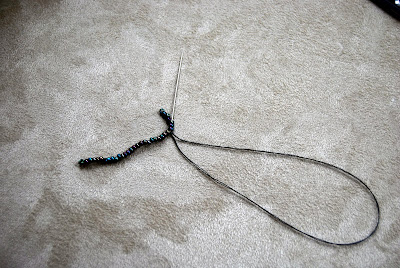
1. Double over your string and load about 6 beads on it. Don't tie the end.

2. Tie a double knot around the end one.

3. Hide your string tail by sliding the rest of the beads up.

4. Load up your string with beads.

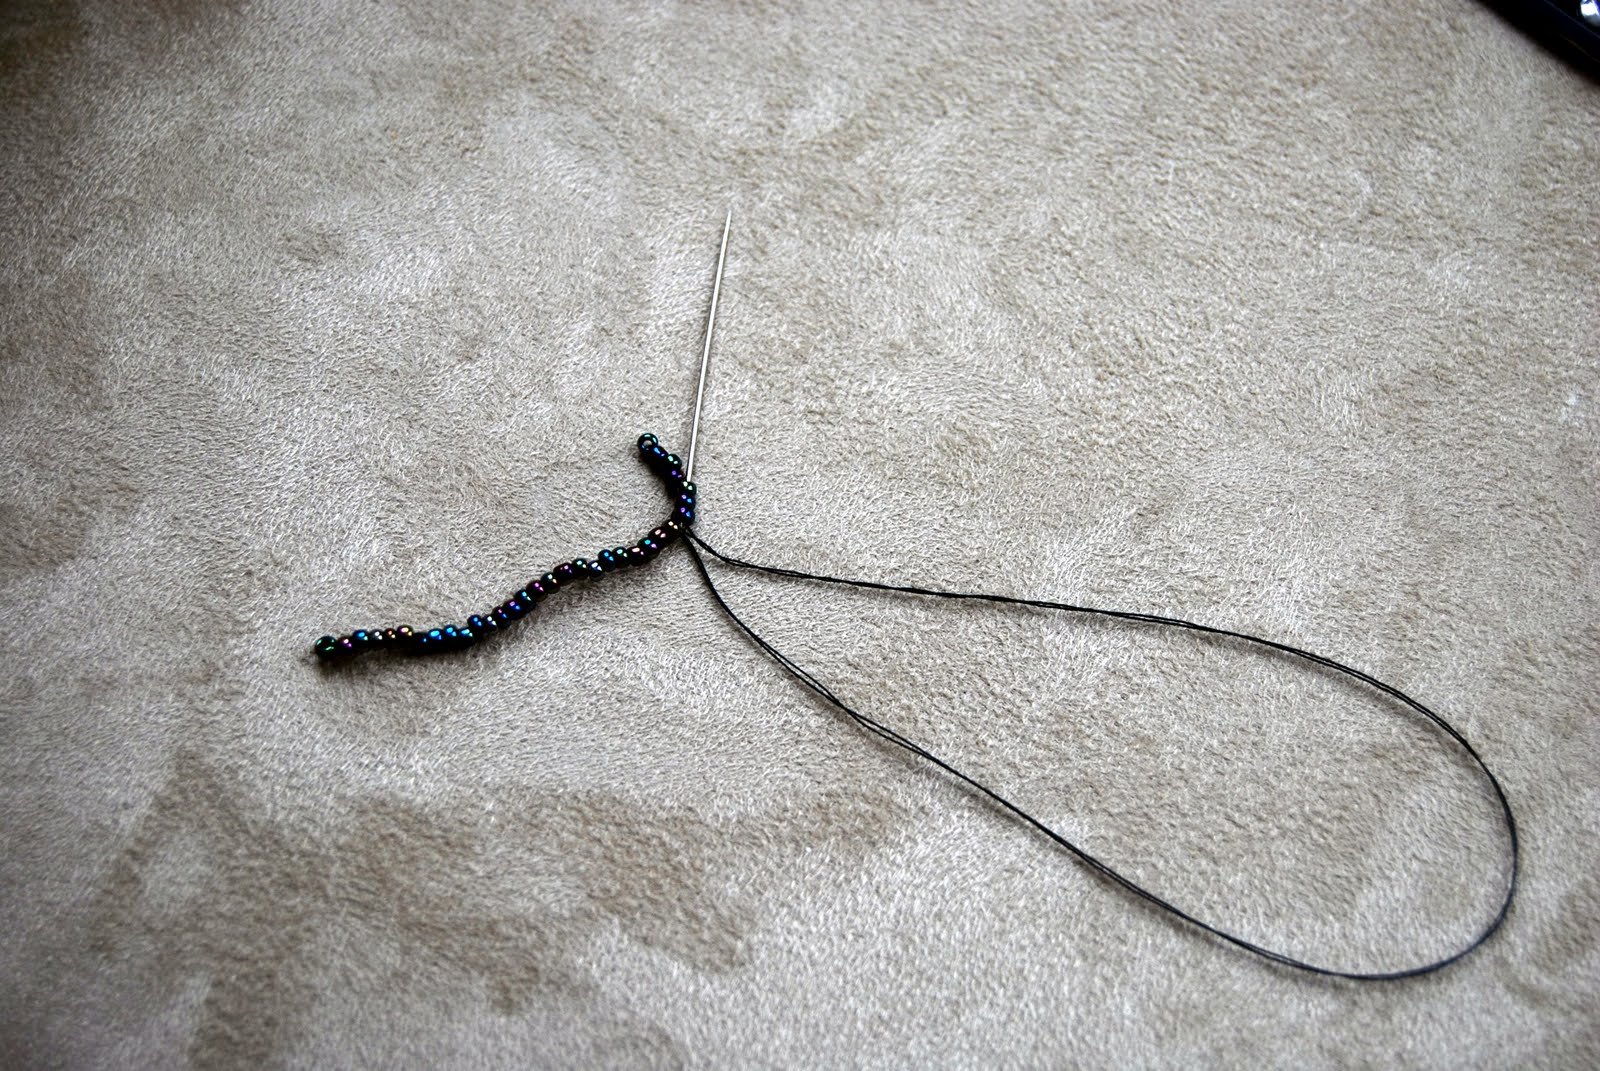
5. When you have as many beads as you need, push your needle through the last few beads you strung, except the end one.

6. You need to tie another double knot in between the two beads where the needle came out.


7. Push the needle back through a few beads to hide the tail.
8. Clip your string

9. You're done! Now the string of beads is ready to be sewn to the front of the shirt! That wasn't so bad, was it? :)
1. Double over your string and load about 6 beads on it. Don't tie the end.

2. Tie a double knot around the end one.

3. Hide your string tail by sliding the rest of the beads up.

4. Load up your string with beads.

5. When you have as many beads as you need, push your needle through the last few beads you strung, except the end one.

6. You need to tie another double knot in between the two beads where the needle came out.


7. Push the needle back through a few beads to hide the tail.
8. Clip your string

9. You're done! Now the string of beads is ready to be sewn to the front of the shirt! That wasn't so bad, was it? :)
Thursday, December 16, 2010
An Unexpected Combination

There are few things more satisfying than being able to create a custom piece of jewelry for any outfit. These were created out of desperation-and I LOVE them. I wear them constantly, they go with most of my wardrobe, and they are totally unexpected. The rings on the bottom are my favorite part- no one has a pair like these babies. :)
Thursday, November 18, 2010
Beaded Flower T Shirt
I had so much fun creating this shirt and I'm so excited to be sharing it with you today! This is a gift for my SIL for our handmade Christmas exchange. She hasn't seen it yet, but I know she's gonna love it!
Materials:
Shirt
Value pack of glass seed beads
Fusible Interfacing
Thread
Needle
Pattern

1. Download my pattern
Beaded Flower Shirt - and trace it onto the smooth side of the FUSIBLE INTERFACING. **I only had regular interface, so I had to pin my pattern on. It was a pain. Save yourself a lot of trouble and buy the fusible kind.**
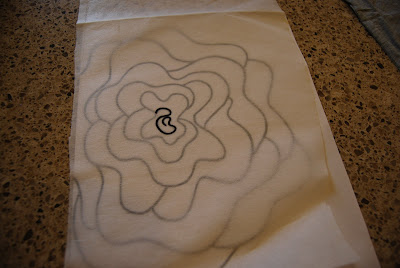

2. Cut out the pattern, leaving about 1" of space around.

3. Iron on your interfacing to the INSIDE of your shirt, making sure that it doesn't wrinkle underneath the pattern. **If you don't have the fusible kind, pin the heck out of it so it doesn't move.**

*Click here for a step-by-step tutorial on how to create the string of beads, as my explanation is crummy.
4. **I'm sorry I don't have a picture of this. I figured it out through trial and error and forgot to take pictures** Thread your needle (1 long piece folded over so it is "double") and string 3-5 beads. Take the needle, and push it back through the 2nd bead closest to it (there will be a loop around the first bead), then 2 more beads. **think of it as an "i", where the dot is the bead closest to the needle (you DON'T go through it), and the straight part has 2 lengths of string through it because you went through it again with the needle.** At this point, you will double knot your string so your 5 beads are completely secure and won't fall off. Now, load up your string with beads. I found that it was better to try and measure how long each section was, then make a bead length equal to that. When you have the right amount of beads, you do the confusing loopy thing again with the needle. To tie the knot, you will take your string (once it has been pushed through 5 or so beads), loop it around the beaded string, and pull tight. Do this twice.

5. Working from the INSIDE of the shirt, you will carefully whip stitch the beaded string to the FRONT of the shirt. You want to remember to keep the stitches small. This will be easiest if you stitch between the beads, instead of on top of them. Making any sense at all?


6. You are done! Hooray for you!

Tuesday, November 16, 2010
Lacy Tank Top
**I apologize in advance for the terrible picture quality. I was on vacation when I created this tutorial, and my camera was having serious problems.**
Materials:
1 tank top (mine was $5 at Walmart)
1 pkg large GLASS pearls
1 pkg small GLASS pearls
lace embellishment
Thread, hand sewing needle, sewing machine
3" X 3" piece of tulle

1. Pin your lace where you want it

2. Using a sewing machine, sew carefully around the lace to hold it in place.

3. Fold your piece of tulle, but not squarely. Does that make sense?

4. Hand sew your folded tulle onto the tank top. *Ignore my pearls everywhere. I got ahead of myself*

5. Lay out your pearls in the pattern you decide and hand sew them to the tank.

6. Enjoy your new tank top!

Monday, November 15, 2010
Quick Floral T Shirt
I made this cute shirt for my sister's birthday. Admittedly, it was kind of lame because I didn't make the decoration, but I gave it to her anyway. And I still think it's cute. And the whole thing only cost $5- shirt ($3, on clearance), embellishment ($2, with a coupon). Score!

Materials:
Shirt
Iron-on Embelishment
Sewing Machine, Iron, and Ironing board
1. Place your embellishment(s) on the shirt.

2. Iron on as per package instructions.

3. Sew around the edges for stability and Enjoy!

Materials:
Shirt
Iron-on Embelishment
Sewing Machine, Iron, and Ironing board
1. Place your embellishment(s) on the shirt.

2. Iron on as per package instructions.

3. Sew around the edges for stability and Enjoy!
Subscribe to:
Posts (Atom)